Feeds:
Posts
Comments

Posts Tagged ‘Terrain’

This might not seem like such a big deal, but for some reason I had issues creating a 1″ square tile. I figure if I could find a way to make the “perfect” tile, I could then use it as a push mold for sculpey in order to create more detailed tiles down the road.

I found a surprisingly simple solution. First, I searched high and low for a 1″ square cookie cutter, but to no avail. I eventually stumbled across some old legos and discovered that you could lay them out in such a pattern that they form a near perfect 1″ interior square.

I then tried several different products to pour into the mold, and got the best results from using hydrostone mixed to the consistency of putty and pushed into the mold then scraped level with the top. Although these two pictures of the mold in use show me casting with resin.

Once I created a good standard tile, I made a mold of it using mold max 30 from smooth-on. This was only the fourth mold I’ve ever created. Mold max 30 is a two part mold making RTV, and thus far I’ve had great success with it. It has been incredibly easy to use. In order to create the mold, I took my favorite tile, glued it down to some glass (provided by an unused picture frame), and built a lego mold around it. For good measure I placed non-hardening clay around the edges to stop any seapage. I discovered the hard way while attempting to cast my first project that if you don’t glue smaller objects down they will float to the top of your mold making material. I know it seems pretty self explanatory, but we’re all allowed our mistakes… right? Here are some pics of the process.

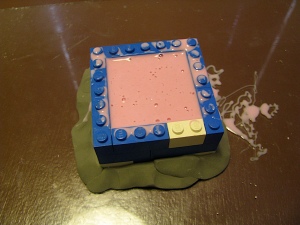
There are two molds because I had mixed up too much mold max and had an extra tile laying around that I hadn’t been overly impressed with but I decided, “what the heck might as well use it, who knows I might be able to use it somewhere.”

And that’s how I created a mold for my first batch of 1″ square tiles. Stay tuned for more information on how I plan on using the mold. Thanks for reading.

Read Full Post »

One of the things that I find to be prohibitive to miniature gaming is the constant need for measuring devices. While gaming this can be time-consuming and make an already slow movement process even slower. On top of all of this you have the problem of fitting a ruler or other device into the confined spaces that usually accompany a heavily, dimensionally terrained piece. You have players attempting to reach down and measure in confined spacing. My solution to this will be to attempt to “build in” a one inch grid system to every terrain piece that I create, but to also make it to where the grid blends in with the terrain thereby making less unobtrusive. Therein lies the challenge.

I have done this in the past by using the tiles from heroscape. This was an immensely successful endeavour. I modified the terrain to make it much less “kiddy” and much more realistic. (Well, as realistic as you could make plastic hexes look.) I enjoyed the process and the end result made it well worth the effort, but while this was well suited for wild, undeveloped areas of a map, the process nor the hexes translate well into a fantasy or sci-fi interior-scape. Thus begins my current obsession. Creating a modular fantasy village scape with built-in grid lines.

Several companies have come up with solutions to this dilemma. Hirst Arts sells molds for creating miniature tiles that you can put together in a grid like fashion. (While I have drooled over Mr. Hirst’s molds for years I have yet to purchase anything from him, maybe it’s because I feel like I will be admitting defeat by not creating my own scratchbuilt tiles and terrain, though I continually swear to myself that I’ll get around to ordering eventually.) Keebler Studios is another site that I’ve recently discovered that sells molds including miniature brick tiles. (I have actually taken the plunge and ordered Tiny Bricks Mold 5 from John at Keebler Studios and I am eagerly awaiting the arrival of the mold in the mail. Once I get it I’ll post a review. Thus far I haven’t found much information on Keebler Studios outside of his own website, linked on the side, and some die-hard miniature terrain makers. Also I found the ordering experience and contact with Mr. Keebler to be straight forward, quick, and enjoyable. We shall see how the shipping process occurs.) One of the things that really sold me on ordering a tiny bricks mold from Mr. Keebler was the scale. Each individual brick is 1/4″ by 1/8″, which in my opinion is closer than any other product I could find to the 28-30mm scale that I was building in. Finally, another site that I discovered was Dwarven Forge. If you’re hardcore enough to still be reading this you’ve probably heard of them before. They sell pre-made, pre-painted, dungeon, castle, village, and sci-fi pieces that all have a built-in grid system. (I’ll post a link on the sidebar.) The major drawback to these pieces is their cost, and in my humble opinion the lack of vast variety. I have never owned any of their pieces but you can read rave reviews of them across the web.

I will take pictures tonight as I struggle through the process of creating road pieces with grids for my future miniature village. (Also I’ll work on putting together some pictures of my modified heroscape terrain pieces.)

Read Full Post »